No matter how small or large, all applications must undergo a specific series of processes, such as generating and compiling source code. Developers can manually configure these processes, but it’s a time-consuming burden.
Maven is like a project manager for software development. Imagine you’re leading a team to build a house. Maven would be the one who ensures everything runs smoothly.
It organizes the project’s structure, tracks dependencies (like materials and tools), and handles the build process.
Just as a project manager coordinates tasks and resources, Maven coordinates the compilation, testing, and packaging of your code. It saves time by automatically resolving dependencies from repositories, just like ordering supplies from trusted vendors.
With Maven, developers can focus on coding, knowing that the project’s management is taken care of, like a reliable project manager for your software projects.
What is Maven?
Maven is a popular open-source build tool developed by the Apache Group to build, publish, and deploy several projects at once for better project management. The tool allows developers to build and document the lifecycle framework.
Maven is written in Java and is used to build projects written in C#, Scala, Ruby, etc. Based on the Project Object Model (POM), this tool has made the lives of Java developers easier while developing reports, checks, build and testing automation setups.
Maven focuses on the simplification and standardization of the building process, taking care of the following:
Builds
Documentation
Dependencies
Reports
SCMs
Distribution
Releases
Mailing list
What is Maven Lifecycle
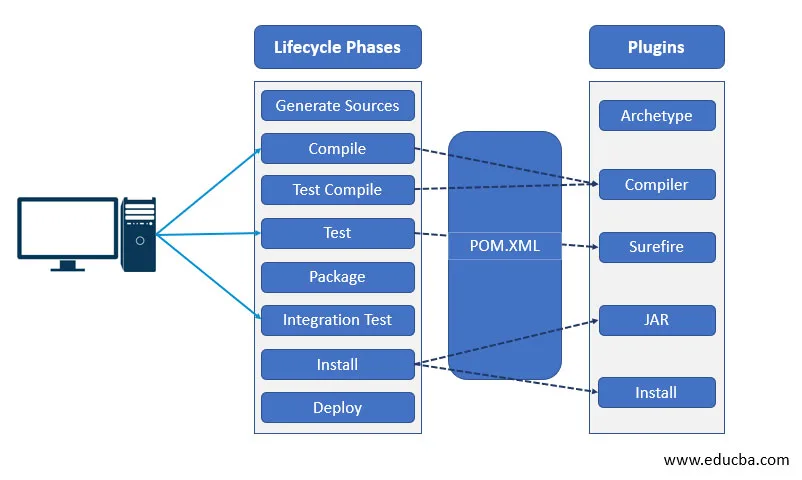
Maven is built around the concept of a build lifecycle, which defines the order of execution for goals.
The default Maven lifecycle consists of 8 major phases: Validate, Compile, Test, Package, Integration Test, Verify, Install, and Deploy.
Each phase represents a specific step in the build process and has its own set of goals to be executed.
For example, the Compile phase compiles the source code, the Test phase runs unit tests, and the Package phase creates a distributable artifact.
Maven follows a sequential order, where executing a specific phase also triggers the preceding phases.
Goals in Maven represent granular tasks and are packaged in plugins.
Plugins contain one or more goals and contribute to the creation and management of the project.
The Maven build lifecycle includes three built-in lifecycles: default, clean, and site.
The default lifecycle handles the regular build process, the clean life cycle removes generated artifacts, and the site life cycle generates project documentation and reports.
Overall, the Maven lifecycle provides a structured and standardized approach to building and managing projects, ensuring consistent and reliable results.
Phases of Maven Lifecycle

Maven Clean Lifecycle:
1. The Maven clean lifecycle consists of the following phases:
pre-clean
clean
Post-clean
2. By using the Clean phase (mvn clean), you ensure a clean and consistent build environment. It removes previously generated artifacts, reducing the risk of conflicts or outdated files.
3. Ensures that subsequent builds start from a clean state, minimizing potential build errors. Provides a fresh workspace for developers, leading to improved productivity and reliability.
Maven Build Lifecycle:
1. The Maven build lifecycle consists of the following phases:
validate
compile
test
package
verify
install
deploy
2. The Build phase (mvn compile, mvn test, mvn package, etc.) automates the compilation, testing, and packaging processes.
3. It ensures consistent and reliable builds across different test environments.
4. Maven’s dependency management handles the resolution and integration of external libraries, simplifying the development process.
5. Build reports and test results provide valuable insights into the project’s health and code quality.
Maven Site Lifecycle:
1. The Maven site lifecycle consists of the following phases:
pre-site
site
post-site
site-deploy
2. The site phase (mvn site) generates comprehensive project documentation, reports, and metrics. It facilitates better understanding and collaboration among team members.
3. API documentation and code metrics help maintain code quality and adhere to best practices. Detailed reports, such as test coverage, facilitate effective testing and quality assurance.
Setting up a Maven project
Step 1: Install Java JDK
Install Java (JDK 1.7 or higher) on your machine. Java serves as the backbone for Maven, providing the necessary environment to bring your projects to life.
Step 2: Download Maven
Head over to the official Apache Maven website. Download the Maven binary zip file, unbox it, and let Maven dazzle you with its capabilities.
Step 3: Configure Maven’s Path
Set up the MAVEN_HOME environment variable, pointing it to Maven’s bin folder. This helps set up seamless communication between your system and Maven.
Step 4: Check if Maven is Installed properly
Know whether your Maven is installed correctly by checking its version. Open the command prompt, and type the below command to know the version of Maven installed.
mvn -version
Step 5: Create a new Maven Project
Create a new project in Maven with the below command.
mvn archetype:generate
Maven will create a structure for your project.
Step 6: Add Maven Dependencies
To enrich your project’s capabilities, add dependencies to your project’s pom.xml file.
Step 7: Create a Maven Project
Maven will compile, test, and package your project using the below command.
mvn install
This command will build the Maven project and installs the project files ( JAR , WAR , pom. xml , etc.) to the local repository.
Launch your project after you complete the build.
Maven sets the stage for a smooth, organized, and efficient project management experience. Embrace its simplicity, and let Maven revolutionize your development journey.
